Sunday, March 31, 2013

Picture Polish Pshiiit & Ariel's Tale

Manicure time!

I had a lot of fun with my Doctor Who galaxy nails yesterday, and it was hard to remove them, but the nail polish show must go on!

So it's time for something new, and actually another technique I've wanted to try and managed to get inspired for!

Picture Polish Pshiiit & Ariel's Tale
For today I wanted to try what I call a window manicure (I'm not sure if that's what it's really called haha), where part of the manicure is over natural nail instead of another color.

I recently received Picture Polish Pshiiit and Ariel's Tale for my birthday and thought that they both would make a really great combination color wise.  Pshiiit is a peacock teal color with a bit of blue to green shift and little sprinkles of turquoise flakes in it.  Ariel's Tale is a multi-size turquoise glitter coat.

With the help of a little tape, I completed this look.

What do you guys think?  Have you ever tried what I'm calling window manicures before?

Leave me comments and Like and Follow me!

Hugs & Kisses & Great Polishes!

~ Cat

Saturday, March 30, 2013

A good man returns...

Hello all!

I have a really exciting manicure today!  Or at least exciting to an uber geek like me haha.

I'm hoping at least a few Whovians check out my blog on occasion, if not I'm certainly willing to convert those open to becoming one!

But today is a big day for those of us who have already been consumed by Doctor Who and have been waiting longer than Amy Pond for that TARDIS to appear in our gardens.

But for today, in the hopes that I'd need to be prepared for the arrival of my Time Lord, I painted my nails for the occasion.

Galaxy Nails & a TARDIS
For tonight I decided it was the best time to make my first attempt at galaxy nails!

I'm not entirely sure they came out how I wanted, but I do like them (if that makes any sense).

For the nebulas in the galaxy nails I used a lot of polishes, and bits of torn up make up sponge and two small and smaller dotting tools.

I started with a base of two coats of Finger Paints Black Expressionism.


The polishes I used for the nebulas, in the order I sponged them on, are:
  • OPI I Saw...U Saw...We Saw Warsaw
  • OPI My Boyfriend Scales Walls
  • Julep Marion
  • Zoya Meryl
  • Sinful Colors Unicorn
 After I sponged in my nebulas I used some acrylic paint and my dotting tools for the larger stars and then painted on a coat of China Glaze Fairy Dust for some fun twinkling star effects.

Now, for the TARDIS, I started with two coats of OPI Eurso Euro and added my fun phone box details with acrylic paint and a fine nail art brush.

Then I sealed it all with top coat and now I'm ready for my mad man in a box!

So Doctor, here I am!  Allons-Y!

Hugs & Kisses & Great Polishes!

~ Cat

Friday, March 29, 2013

Color Club Cherubic

I have a lovely polish to show you today (that I put on yesterday, sorry yesterday got kinda busy so I didn't get to post).

Sadly the sun wasn't shining much yesterday so I had to use my fake sun, which means the gorgeous-ness of the polish isn't done justice at all, but it's still pretty!

Color Club Cherubic
This is Color Club Cherubic, a holographic nude color from Color Club's original Halo Hues line in 2012.

Color Club has come out with holos before, but with the introduction of their Halo Hues collections, they kinda set the bar pretty high in the level of holographic polishes.  All of the 2012 and 2013 (I will be swatching those soon) Halo Hues are SUPER holographic and completely gorgeous!

What do you guys think of this one?  Would you like to see swatches of the original Halo Hues releases as well, or have they been done to death?

Leave me a comment and Like and Follow me on Facebook, Twitter, Tumblr, Pinterest, and Instagram!

Hugs & Kisses & Great Polishes!

~ Cat

P.S.  Be ready for a SUPER DUPER exciting manicure for tomorrow!!!!

Wednesday, March 27, 2013

Pink Wednesday: OPI The Impossible

It's Pink Wednesday again everyone!!

I'm getting to really love all my pinks more just for the fact that I get to find fun ways to make sure I have my pink on!

Today is no exception...

OPI The Impossible
This beauty is OPI's The Impossible, one of the liquid sand polishes from their recent Mariah Carey collection.  This polish is a richly pigmented deep watermelon pink polish with a jelly base (that's pretty opaque in three coats) and lots of matching watermelon pink glitter in small and lmedium hexes and some silver holographic star glitters. 

Of course, as a liquid sand polish, it has that matte, ultra fine sandpaper textured finish.  Like I mentioned in my liquid sand gradient manicure a few weeks ago, the texture takes a little getting used to, but it's not as irritating as some might imagine, the texture in the OPI polishes almost has a velvety feel to it.

What do you guys think of this polish?  What do you think of the new trend of textured polishes?

Leave me comments and Like and Follow me!

Hugs & Kisses & Great Polishes!

~ Cat

Tuesday, March 26, 2013

Zoya Piaf & Rainbow Honey The Worst Possible Thing

Hi everyone!

I'm here with a kind of Easter-y nail look to share with all of you!

I know it's not quite Easter, but these two polishes were just begging to be combined into a manicure, so I did it!

Zoya Piaf & Rainbow Honey The Worst Possible Thing
I started this manicure with a base of Zoya Piaf, a pastel yellow metallic shimmer polish that looks so pretty when it hits the light.  But of course, if you want something to look amazing in the light, you need to add glitter...so I did!

Over Piaf I painted on a coat of Rainbow Honey The Worst Possible Thing, a glitter coat full of holo sparkle, purple hexes, aqua tiny hexes and iridescent flakes.

Together, they create a really gorgeous Easter look!

What do you guys think?  What are you wearing on your nails for Easter?

Leave me comments below and Like and Follow me!

Hugs & Kisses & Great Polishes!

~ Cat


Sunday, March 24, 2013

Megan Miller Collection Foxy and Hard Candy Sugar Rush French Tips

I have a fun take on the classic french manicure to share today!

I'm not normally one to wear french manicures, I'm not sure why...when I try to do them myself they just never seem to be what I want them to, at least most of the time they don't.  So normally I reserve french manicures for my rare trips to the nail salon, but every now and then I manage to do one on my own that actually looks nice, and today's manicure just happens to be one of those!

Megan Miller Collection Foxy & Hard Candy Sugar Rush
For this manicure I started with a base of Megan Miller Collection in Foxy, a somewhat jelly-like creme in a warm fox grey (go figure haha).  It seemed a bit streaky at first, but evened out after my usual three coats.

Then, once that was completely dry, I placed my french tip guides (yea, i'm a cheater, I'm not patient enough to freehand french tips) where I wanted them and applied two quick coats of Hard Candy Sugar Rush from their brand new Candy Sprinkles collection, a white base polish with black, white, and silver tiny glitters in it.

I was rather fond of this manicure once it was done, I didn't have my usual aversion to the french look and the two polishes together looked nice.

What do you guys think?  I'm thinking of doing a swatch-fest of the colors I picked up from Hard Candy's new collections (most of them being the Candy Sprinkles), would you like to see that?

Leave me comments and Like and Follow me!

Hugs & Kisses & Great Polishes!

~ Cat

Saturday, March 23, 2013

Pure Ice Crimson and Maybelline Sapphire Masquerade (aka My Unintenionally Patriotic Mani)

Hi all!

I'm here with today's manicure of course!

This one is kinda funny, it basically started out as "how can I add an accent nail to a simple red polish" and once done became a gorgeous patriotic look, which I love, even if it wasn't intended haha.

Pure Ice Crimson & Maybelline Sapphire Masquerade
For this manicure I started with Pure Ice Crimson, a beautiful simple red satin/shimmer finish color that leans a bit more pink.  The pigmentation is great for this one too though it can stain if left on longer than a day (my nails had minimal staining after about 24 hours, but it was there).

Now, if you've been following my blog, you know simple manicures aren't what I do often, though I do love them.  So I went to my stash and searched for something I could use for an accent and came up with a lovely option in Maybelline Color Show Sapphire Masquerade from their Sequins collection.  This polish is a brilliant sapphire blue glitter with little sprinkles of crimson red hexes in it.

Together, the combination of these two polishes is so pretty...and clearly a lovely way to portray the US's favorite colors.  In fact, it went really well with the Avengers shirt I wore today haha!

What do you guys think?  Think the combo is too patriotic to just be a manicure or am I safe with bright jewel tones anytime?

Leave me comments and Follow and Like me on Instagram, Twitter, Facebook, Pinterest, and Tumblr!

Hugs & Kisses & Great Polishes!

~ Cat

Friday, March 22, 2013

Butter London Shag

Time for another manicure!

Went with simple but still bold once again, and I also dug into my small collection of high end brands for this one, so I hope you enjoy!

Butter London Shag
This beauty is Butter London Shag, a dark kind of burnt copper orange metallic polish that is just gorgeous.  It's rather neutral but still clearly makes a statement. Shag goes on opaque in three coats and has a gorgeous metallic finish, not really a foil since it's not exactly reflective, but so pretty.

I'm rather fond of this polish, it applies well, looks great, and I even got a compliment from my dad!

All in all, a complete win!

What do you guys think?  Do you have a simple but bold polish look?

Leave me a comment and Follow and Like me!

Hugs & Kisses & Great Polishes!

~ Cat

Thursday, March 21, 2013

Milani Move On Mauve

Hi everyone!

Sorry being a day behind, I spent the afternoon with friends yesterday and didn't get home until late, but I'm here now to post yesterdays manicure.

Of course it was Pink Wednesday yesterday and I made sure I had a fun pink to share!

Milani Move On Mauve
I decided I'd use one of the new Milani High Speed Quick Dry colors that came out recently.  This lovely polish is called Move On Mauve.  Clearly it's a mauve, dusty rose color, but what makes it unique is that (though you can't really see it in the picture) in the right light it has a slight violet flash.

Now this polish is labeled a quick dry, one coat formula.  Now I can't say this polish is by any means a one coat, it went on pretty sheer for my first coat, but that may work for some.  The other thing is the quick dry, now, the first coat dried really quick, but any coats after that didn't feel much faster than regular polish, which isn't an inconvinince unless you are applying it specifically for the quick dry purpose.

No matter, the color is lovely and a nice subtle way of adding color if you work somewhere that doesn't allow bold polish.

What do you guys think?  Have you tried other Milani Quick Dry polishes?

Leave me a comment and Like and Follow me!

Hugs & Kisses & Great Polishes!

~ Cat

Wednesday, March 20, 2013

Del Sol Ruby Slipper

Sorry for the late post everyone!

Crazy day and I've let myself be distracted by the wonder that is Doctor Who.

But I do have my manicure for today to show you and boy is it an exciting one!

Del Sol Ruby Slipper Indoors

Del Sol Ruby Slipper Outdoors (Sunlight)
Today I decided to try out one of my color changing polishes!  No, not the kind that change with temperature, but the ones that change in sunlight...yup I said sunlight!

This is Del Sol's Ruby Slipper, a slightly green tinted glitter coat inside, but outside (and here painted over My Boyfriend Scales Walls) it turns red!  And a really pretty shade of red I must say.

What do you guys think of it?  Have you tried any solar polishes before?

I have a few more to show you all eventually, just let me know if you want to see more!  And don't forget to Like and Follow me on all your favorite places to spend time not doing homework!

Hugs & Kisses & Great Polishes!

~ Cat

Monday, March 18, 2013

Sally Hansen's Mermaid's Tale and China Glaze For Audrey Half Moons

I have a new manicure today!  Not that you expected any less...

Though Spring Break neons are done, I did promise fun manicures nonetheless, and I'm hoping I am delivering.

Well, here's goes...

Sally Hansen Mermaid's Tale & China Glaze For Audrey
For this one I started with a base of China Glaze's For Audrey (three coats), a true Tiffany blue creme.  This color is gorgeous on it's own of course, but I wanted a little more pizzazz so I turned to what else?  GLITTER!

I decided I hadn't done a half moon in a while so I pulled out my paper reinforcers (cutting them in half cause they stick better that way) and placed them over the DRY base color and painted on two coats of Sally Hansen's Complete Salon Manicure Mermaid's Tale.  This color is their new dupe for Deborah Lippmann Across the Universe, a navy blue jelly base with blue, teal, and green hexes and micro glitter.

Overall this whole manicure just screams fish (oddly enough I think of the Rainbow Fish, though there is no holo haha).

What do you guys think?

Leave your comments below and Like and Follow me on social media!

Hugs & Kisses & Great Polishes!

~ Cat

Sunday, March 17, 2013

KBShimmer Glow Stick

Hi all!

Today is my last Spring Break Neon manicure, and funnily enough my 100th post (I swear I did not plan that haha).

I wanted to finish this week off with a biggie (and probably one of my favorite manicures too).

I hope you're excited!

KBShimmer Glow Stick
For today, I used KB Shimmer's polish Glow Stick, a super bright neon yellow full of silver holo glitter of all different shapes, hexes, bars, and stars (you can kind of see the star on my index finger if you tilt the screen back sorry haha).  I made sure to put it on over My Boyfriend Scales Walls, just to make sure it didn't end up super sheer, and to make the yellow pop that much more.

However, I wanted to spice it up a bit more with some gemstones that I found in my all black shapes dial a stone thingy, and I applied them in kind of a mix-matched gradient effect....sort of.

What do you guys think of this one?  If I've figured out nothing else this past week I've learned these things, neons should pretty much always go on over white undies and no matter what nail art with neon polish will almost always look like the 80s in some way lol.

I'm back to "normal" manicures tomorrow, but don't worry they'll still be fun!

Leave me comments below and Follow and Like me on Facebook, Twitter, Tumblr, Instagram, and Pinterest!

Hugs & Kisses & Great Polishes!

~ Cat

Saturday, March 16, 2013

China Glaze Under the Boardwalk & Julep Madison Stripes

More neon is here!

Sadly Spring Break is almost over (and I'm out of neons after tomorrow's manicure talk about good planning) so this is the next to last neon manicure for me to share for now.

But, don't be too sad because my last two are still a lot of fun!

Tonight's for example was my first attempt with actual nail striping tape!

China Glaze Under the Boardwalk & Julep Madison
For this manicure I started with Julep Madison, over my usual My Boyfriend Scales Walls undies (those darn sheer neons).  Madison is a bright electric pink neon, pretty much exactly the color you think of when you hear the words neon pink.

Then, after cutting and carefully placing my striping tape (the longest process in the whole manicure) I painted on a coat of China Glaze Under the Boardwalk, a neon magenta color.  Then I peeled off the tape, and voila!  Neon pinstripes!!

Though it's neon, this manicure kind of reminds me of dressing tents from old summertime beach movies...you know the ones with all the clean-cut 50s kids playing volleyball and barbequing, singing motown and whatnot...yea those!

What do you guys think?  You looking forward to seeing tomorrow's final neon manicure?!

Leave me comments below and Follow and Like me on all my social media!

Hugs & Kisses & Great Polishes!

~ Cat

Friday, March 15, 2013

Sation Loudest Color and OPI Black Spotted

Friday's neon manicure is here for you all to see!

I wanted to try a new fulfilled lemming (and lovely birthday present from my friend Kim) and thought my neon week would be the perfect opportunity!

Would you like to see?  Of course you would!

Sation Loudest Color and OPI Black Spotted
For this one I started with a base of Sation Loudest Color (one coat over My Boyfriend Scales Walls), a super bright yellow-green neon.  A really pretty color...that takes FOREVER to dry!  But, eventually it does dry (with the help of a quick dry top coat haha) and I was able to add the next element of this manicure...my lemming and lovely birthday present...

OPI BLACK SPOTTED!!!!

I love how this special effect topper looks over this neon...kinda reminds me of those mesh shirts you see people wear for 80s dress-up...but such a fun look!

What do you guys think?

I can't wait to try Black Spotted over other manicures in the future!

Hugs & Kisses & Great Polishes!

~ Cat

Thursday, March 14, 2013

Julep Neons Gradient

More Spring Break! (yup I still have more neons haha)

I decided to go with more fun and multi-color and tried a gradient...and boy did it work out well!

Julep Bethany, Nina, Niki, and Fiona
For today's manicure I had to start with OPI My Boyfriend Scales Walls undies, simply because these neons can be quite a bit sheer, plus the white makes them pop of course!

Over these undies I dabbed on a gradient (after painting stripes of each color on the wide end of a makeup sponge) of Julep's Bethany, Nina, Nikki, and Fiona.  The result was this fun gradient that reminds me of a fun tropical drink or a sunset!  I was really impressed at how well this came out actually, photos don't do the neon quality justice, you'll just have to try this one yourself to see just how gorgeous it is one the nail!  Though I do recommend prepping your fingers with tape before sponging to make clean up A LOT easier, haha.

What do you guys think of this one?  Do you have any fun ways to make awesome gradients?

Leave me comments and Like and Follow me on Facebook, Twitter, Tumblr, Instagram, and Pinterest!

Hugs & Kisses & Great Polishes!

~ Cat

Wednesday, March 13, 2013

Pink Wednesday, Spring Break Neon Edition: China Glaze Flirty Tankini

Yay for killing two birds with one stone!

I managed to do both a Pink Wednesday and Spring Break Neon manicure today!

In fact, I just really liked this manicure in general, let me show you!

China Glaze Flirty Tankini
For my neon shade today I chose China Glaze Flirty Tankini, a pretty kind of coral-y neon pink with a bit of frost to it.  It's a really fun color with the usual neon semi-matte finish but this one looks squishy...if that makes any sense.

But to make things more exciting I had to add a little shine so I decided to do some fun geometric pattern with my rhinestones! 

What do you guys think?  This neon week is getting really exciting!!  Can't wait to show you what's next!

Leave me comments and Follow and Like me all over the place!

Hugs & Kisses & Great Polishes!

~ Cat

Tuesday, March 12, 2013

China Glaze Flying Dragon

Spring Break Neon Week manicure #2 is here!

I'm loving my neons and wanted a chance to show off one of China Glaze's staples, found in their core collection line after it's release in the Ink'd collection.

I'm talking about China Glaze Flying Dragon!

China Glaze Flying Dragon
Flying Dragon is a fun neon purple based polish with tiny blue and fuschia glitters in it.  The natural dry of this polish is the typical neon almost matte finish, but I added some top coat to make the glitters pop a bit more.  This picture shows three coats, but in person it's not really as sheer as it looks in the photo (a nice change haha).

I do have to say this polish, as with a lot of neons can have some issues with picking up, especially in the first coat, so when painting your nails with it, try to avoid going over areas you've already painted or you'll end up with bald spots.

After three coats though, this color is gorgeous and lots of fun!

Looking forward to neon manicure #3 tomorrow!!

Leave me comments and Like and Follow me on all your social media!

Hugs & Kisses & Great Polishes!

~ Cat

Monday, March 11, 2013

This Manicure is So Bright....

...It's gotta wear shades!

Yup, that's right, it's time for my first neon manicure for Spring Break!!

I wanted to start with a bang, and I think I succeeded...

Lemme show you!

OPI My Boyfriend Scales Walls, China Glaze Pool Party, Sun Worshiper, Sun-Kissed, I'm With the Lifeguard, & Towel Boy Toy, Cheeky Stamping Plate CH 37
Ta-Da!

For this manicure I started with a base of three coats of  OPI My Boyfriend Scales Walls, a slightly grey-tinted white.  Then I went to my handy dandy stamping plates for the fun Spring Break inspired image of sunglasses on Cheeky plate CH 37. Then I selected some of my best neons for stamping, all of these being China Glaze.  Starting with the thumb I used Pool Party, Sun Worshiper, Sun-Kissed, I'm With the Lifeguard, and Towel Boy Toy.

I'm rather proud of how these turned out and love just how fun they are!

What do you guys think?  Are you guys doing anything exciting for Spring Break?

Leave me a comment and Follow and Like me on Instagram, Facebook, Pinterest, Tumblr, and Twitter!

Hugs & Kisses & Great Polishes!

~ Cat

Sunday, March 10, 2013

Zoya Zuza with a little extra sparkle...

I have my manicure for the day for you all to see!

I decided to raid my untried blues and found one I was excited to try, then of course I had to add sparkle!

Let me show you what I came up with!

Zoya Zuza with Snowman Glitter polish
For this manicure I started with three coats of Zoya Zuza, bright and summery turquoise or blue green with a little hint of gold shimmer in it.  Of course this polish is beautiful on its own, opaque in three coats and just the right amount of shimmer to give it a bit of warmth.  But of course, me being me (and the fact that I have so many untrieds to get through) I wanted to add a little something extra, so I turned to my glitter toppers.

There, I found a snowman glitter (you know the ones you find at Christmas) that has some great turquoise/aqua glitter shards, fuschia glitter shards and random sprinkles of multi-colored hex glitters.  This topper added a nice depth and sparkle to Zuza and I love the outcome!

What do you guys think?  Do you have a polish you like to go to add a little pizzazz?

Let me know below and Follow and Like me everywhere!

Hugs & Kisses & Great Polishes!

~ Cat

P.S.  Get excited, because tomorrow starts my week of neon manicures in the spirit of Spring Break!  So yay!!!

Saturday, March 9, 2013

Zoya Avril & OPI Pirouette My Whistle

Hello all!

I'm here with a nice subtle, elegant manicure today!

I wanted to play around with some of the nudes I have and make something really fun, and I think I managed.

Zoya Avril & OPI Pirouette My Whistle
I really like the simplicity of this one, it has an almost bridal quality really (though I'm far from being a bride any time soon lol).  For the base color I used Zoya Avril, a pink-toned nude creme that went on opaque for me in four coats.  Over that I used OPI Pirouette My Whistle, a glitter topper with white matte hexes and silver micro glitter.  I had to do a little dabbing to make sure I got the amount of glitter I wanted, but it went on well.

I'm really enjoying this manicure, it's very ethereal and the tone of Avril looks nice on my skin tone.

What do you guys think?  Do you have a favorite simple and elegant polish look?

Leave me comments below and Follow and Like me on Facebook, Instagram, Twitter, Pinterest, and Tumblr!

Hugs & Kisses & Great Polishes!

~ Cat

Friday, March 8, 2013

Icing Twisted Fantasy

I have a post about an awesome polish from a somewhat unlikely place.

I don't know how many of you have looked at the polishes at Icing (or even Claires) but you'd be surprised at some of the gems you'd find!

I've found a few polishes that I just love at Icing and I have one to share with you that I'm excited about.
Icing Twisted Fantasy
This is Icing's Twisted Fantasy, a gorgeous aqua blue jelly base with multi-colored hex glitters scattered in it.  The base is quite a bit darker in person, but such a pretty kind of peacock aqua color.  This polish was more sheer than I expected, so I have some VNL even after three coats, but it's not completely annoying.  The glitter in this one actually goes on pretty evenly, the first coat may lack much, but after that it has a nice scatter to it and the aqua overlay is a lot of fun.

What do you guys think?  Have you tried Icing polishes, or a polish from somewhere that you unexpectedly loved?

Leave me comments and find me on social media and Like and Follow!

Hugs & Kisses & Great Polishes!

~ Cat

Thursday, March 7, 2013

OPI Wooden Shoe Like to Know

Hi all!

I'm bringing you another manicure, following the philosophy of simple being great.

I wanted to show a gorgeous polish on it's own today, and I hope you all like it!

OPI Wooden Shoe Like to Know
This is OPI's Wooden Shoe Like to Know, a gorgeous milk chocolate color with the slightest hint of reddish purple in it.  What's more, this polish has a great subtle gold-bronze shimmer to it (only slightly visible in this picture, sorry, but it's much more obvious in person).

I really like this polish, I tend to like browns in the bottle but not as much on the nail, but this one has such a nice warmth to it that it looks really great!

What do you guys think?  How do you feel about brown nail polish?

Leave me your comments and Like and Follow me on Facebook, Instagram, Twitter, Tumblr, and Pinterest!

Hugs & Kisses & Great Polishes!

~ Cat

Wednesday, March 6, 2013

Pink Wednesday: Milani Digital and Maybelline Rose Bling

It's another Pink Wednesday!

I'm really starting to love these days, which should be no surprise with my love of pink.

But what's more I like experimenting in ways to do pink nails that don't get boring.

I hope I succeeded today, but even if I didn't, I really liked the outcome for myself, so I'm excited to share it with you all.

Milani Digital and Maybelline Rose Bling
For the main color in this manicure I used Milani Digital from their 3D Holographic collection.  This polish a beautiful combination of a scattered and linear holo in a great blue-toned rosie pink.

For the accent, I used Maybelline Rose Bling from the Color Show Sequins collection.  This is a pale pink, almost rose gold glitter with pink holo hexes and hot pink hexes.

I was afraid these two together would be a bit busy, what with the amount of sparkle, but I was wrong!  The different tones of pink look nice together and the holo glitter next to a holo polish is surprisingly fun.

How do you guys feel about this one?  Have you tried any combinations that you weren't sure about and they ended up working out?

Leave your comments and Like and Follow me in the links in the About Me section.

Hugs & Kisses & Great Polishes!

~ Cat

Tuesday, March 5, 2013

Dollar Nail Art Foil mini review

Hi all!

For Tuesday I wanted to share a new product (well new to me) that technically falls into the two-toned Tuesday category, so yay!

I'm not sure how many of you have heard of nail foils, but they're a really fun nail art product to add a hint of metal, or shine, or unique pattern or finish to your manicures.

I recently was able to purchase my first nail foils from Dollar Nail Art and decided I'd give them a try and share my experience with all of you.

Dollar Nail Art Ocean Mist nail foil
The first color I decided to try was Ocean Mist, a fun metallic foil with a blend of silver, green, blue, and purple to make a pattern similar to what you see when your see oil on top of water in a parking lot.

Before beginning, cut pieces of nail foil from the roll (each roll is about 5 ft.) to fit each nail.

Application took a little practice.  When you order from Dollar Nail Art (just fyi for online orders they require a minimum purchase of $25, less than that you can mail order) and get four foils, they send you a free bottle of their foil adhesive.  To apply, to brush on a thin layer of this adhesive, which goes on milky and dries clear.  When the adhesive is dry it's still tacky, but DON'T TOUCH IT or else it can affect the hold on the foil.

Once dry, take your first piece of nail foil and place it on the nail dull or non patterned side down.  Now, depending on the foil (which is where the practice comes in) it may be better to use either a Q-tip or your fingernail, for this pattern, my finger nail worked best.  Using either one, gently rub the top of the foil over your nail making sure to cover the whole area desired. 

Then, remove the clear backing, which should be basically popping off anyway.  If you've missed any spots, place the foil piece over the bald spot and rub gently to fill empty space.

Now for this pattern, for me, Any use of top coat complete RUINED the pattern, the whole foil would turn silver and never turn back.  I've heard the use of UV gel top coat might work, but sadly I have none to try.  So for me, I had to go without top coat at all. 

That being said, if you know none of your top coats will protect rather than ruin the foils, then I suggest applying them the day you plan to wear them rather than the night before, simply because the foil rubs off very easily without that protection of top coat.  I learned the hard way :(

Nevertheless, despite the issues I had with the foils, I chalk it all up to learning curve.  In general these are gorgeous and a lot of fun as long as you learn the dos and don'ts.  Plus, you can't really beat a dollar a piece!!

Have you tried these nail foils?  Do you have any tips?

Leave your comments below and Like and Follow me on all your social media!

Hugs & Kisses & Great Polishes!

~ Cat

Color Club Sparkle and Soar

Okay, okay...so I know Monday is supposed to be nail art monday, but I completely forgot and by the time I remembered I was in bed going to sleep (as is always the way lol).

But, I hope the beauty of the color makes up for the lack of nail art.

I wanted to break out some of my oranges, a color I love (except burnt orange....) but often forget about sadly.

But I managed to find something gorgeous to show you all!

Color Club Sparkle and Soar w/ Julep Stella
This is Color Club's Sparkle and Soar, a great orange mutlichrom jelly foil...at least that's the best description I can give haha.  It's a really unique polish that's a bright orange with gold and bright green flashes in certain light, which are basically impossible for me to capture on film.  The polish can be a bit sheer, so I put on some Julep Stella undies but even with two coats of that I have some VNL in the right light, so if you're not a fan, make sure you have a really opaque polish for your undies.

As usually this polish is one that reminds me how much I love oranges but makes me sad to know I often neglect them. 

What do you guys think?  What's a polish color you love on but sometimes pass over?

Leave me comments and Like and Follow all over the place!

Hugs & Kisses & Great Polishes!

~ Cat

Sunday, March 3, 2013

My Birthday Manicure! China Glaze Bling It On and OPI You're Such a Budapest

Today's my birthday!  Yup, I'm 24 today!

Not an entirely exciting birthday by any means, but a birthday nonetheless.

I wanted to share the manicure I wore for the day with you all!

I wanted to have something fun on my nails and managed to come up with a great combo from recent polish purchases/swaps.

Here's what I have on.

China Glaze Bling It On and OPI You're Such a Budapest
For the under color I used OPI You're Such a Budapest from the new Euro Centrale collection.  This polish is a beautiful pastel, blue-tinted lavender with a very subtle shimmer to it (difficult to see with the glitter over it obviously).  The formula for this one can be a little thin or streaky for the first two coats, but coat three makes it even and smooth, and it dries with a gorgeous shine even without top coat!

Over You're Such a Budapest I used China Glaze Bling It On from the new Glimmers collection.  This polish a glitter in a clear base, consisting of black and indigo/violet glitters in large, medium, and small hexes and bars.  It's a lot of fun on the nails!  It can lay a little rough, but it isn't too bad and it spreads fairly evenly without needing a lot of dabbing or getting blobby. 

I love these two together, bringing out a bit more of the blue-tinted purples and just looking like a party, very fitting I'd say!

What do you guys think?  Are you a fan of the new collections for Spring?

Leave me comments and Follow and Like me (check the About Me section).

Hugs & Kisses & Great Polishes!

~ Cat

Saturday, March 2, 2013

OPI Man of La Mancha

I'm bringing you another one of the HTF lemmings I've fulfilled!

I actually manged to find this one on Amazon for an amazing deal and just had to snap it up.

It's a polish from OPI's older black labels, from back when they used to do a lot more experimenting with color and finish it seems like.

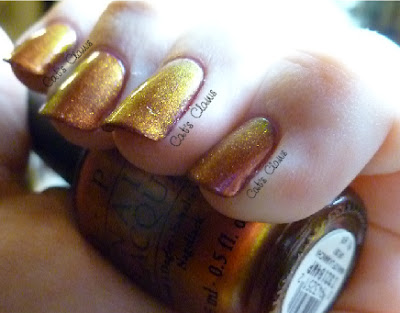
This one is a breathtaking multi-chrome that I'm just in love with and am so glad to say it's part of my collection.

Here's what it looks like.


OPI Man of La Mancha

OPI Man of La Mancha

The polish I'm talking about is OPI Man of La Mancha from their 2003 Holiday on Broadway Collection.  This polish a a gorgeous multi-chrome that shifts from a brick red to a bright copper orange to a gold to a bright flash of green.  It's just fascinating to watch the shifts in light.

To make sure the color was at it's most brilliant I used OPI Manicurist of Seville for undies which just makes the red angle of this polish pop that much more.

I'm in love with this one, I'm really sad to take it off!  But alas, it must happen because I must move on to something just as lovely...

What do you guys think of this one?  Do you have a favorite HTF nail polish?

Leave me comments and Like and Follow me on Twitter, Instagram, Pinterest, Tumblr, and Facebook!

Hugs & Kisses & Great Polishes!

~ Cat

Friday, March 1, 2013

My first Kracie Happy Kitchen kit!! (Major Pic Spam)

Ok, I may be the only person who is as obsessed with these things as I am, but you're here and I'm going to make you see it anyway...MWAHAHAHAHA!!

Alright, I'm back.

I got some of my first Kracie Happy Kitchen candy making kits today from my friend Kim and I was so excited to try them that I decided to make one!!

I started with the cake kit and decided I'd take step by step pictures so you guys can see just what these kits are.

So be prepared for picture spam!

What you'll need:  Kit, Scissors, Water, Microwave

Unboxed kit

Ingredient packets
Step 1:  Cut water scoop and strawberry mold
Step 2: Pour yellow packet into larger cake mold.
Step 3: Pour 2 scoops of water into larger cake mold.
Step 4: Mix well.
Step 5: Pour orange packet into smaller cake mold.
Step 6: Pour 1 scoop of water into smaller cake mold.
Step 7: Mix well.
Step 8: Microwave.  This varies per microwave, mine took 30 seconds, but I suggest doing 15 seconds at a time until done.
Step 9: Let cool slightly and remove from tray. Wash plastic tray.
Step 10: Pour red packet into smaller cake mold.
Step 11: Pour 1 scoop of water into smaller cake mold. Mix well
Step 12: Using spoon, pour red gel mixture into strawberry molds and set aside.
Step 13: Pour blue packet into larger cake mold.
Step 14: Pour 2 scoops of water into the larger cake mold.
Step 15: Mix well.
Step 16: Frost cakes starting with larger layer.
Optional step: Use remaining strawberry gel for cake filling, spread on bottom of smaller cake layer.
Step 17: Frost top and sides of cake.  Rinse out tray.
Step 18: Pour pink packet into smaller cake mold.
Step 19: Pour 1 scoop of water into smaller cake mold.
Step 20: Mix well.
Step 21: Scoop pink frosting into pastry bag.  Squeeze frosting to the corner and snip the corner with scissors.
Step 22: Add sprinkles as desired for decoration.
Step 23: Add gel strawberries to the cake as desired.
And here's my finished product!


What do you guys think?!  It was so much fun!  I can't wait to try the other kits! 

Have you ever tried the Kracie candy making kits?  What's your favorite?

Hugs & Kisses & Great Polishes!

~ Cat