Thursday, January 31, 2013

Maisie Shine "Nice"

I'm here today with my first indie polish post!  YAY!

I'm super excited to share this one with you.

Now, I don't know how many of you all are familiar with handmade, indie polish brands, but if you're not...get that way cause they're all pretty much amazing!

Today, for example, I have a beautiful polish to show you!

This polish was a lovely surprise from my friend, and fellow lover of all things polish, Lindsey, over at Maisie Shine.

It's a polish from her recent Holiday collection, called "Nice" (a counterpart to another lovely of hers, "Naughty").


This polish as a GORGEOUS emerald green kind of satiny frost that actually looks more metallic in person.  Beyond the great color, it's also packed with teal holo hex glitter both medium and small, which gives it a fun sparkle. 

The picture show three coats, with two coats of top coat, and it's so dimensional.  However, this polish goes on fairly sheer in the first coat, so it could also work as a fun topper over complimentary undies. 

Now, as most polish people will tell you, almost any polish that has a lot of glitter in it can get pretty thick as you're using it.  It's a side-effect most tolerate.  However, what's nice about Nice is that in the very few moments that the formula started to thicken up, all i had to do was give it a really good, quick shake and it went right back to a consistency that was much easier to work with, which is a HUGE plus with glitter polishes!

Overall, I'm so happy with this polish, the color saturation and pigmentation are outstanding, the coverage is great, the formula is easy to work with even with so much glitter, and it's just fun and unique!

"Nice" is definitely the perfect name for this polish on multiple levels.

I hope you'll go and try out Maisie Shine, I know I'll be getting more!

Let me know what you think!

Hugs & Kisses & Great Polishes!

~ Cat

Wednesday, January 30, 2013

Mission Nailtrition: COMPLETE!

I can finally show you all the before and after for my Nailtrition treatment!

I'm excited!

Now, to the naked eye of non-nail fanatics, this might not look like much, but I know my people, and I know they'll notice.

Here is the before and after for the whole nails:

Before

After

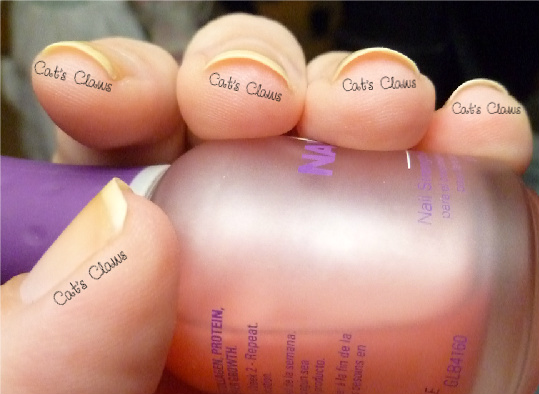
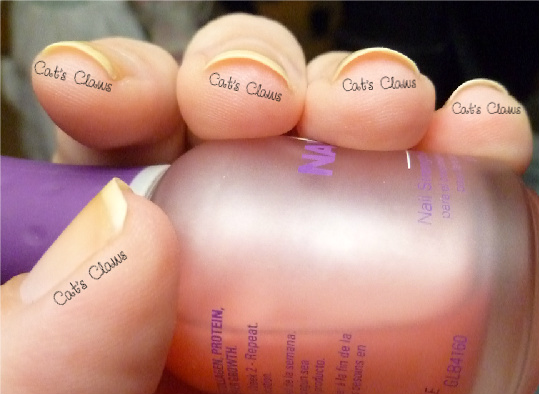
As you can see, the nails are significantly longer, and just look generally healthier (though still stained, sorry guys).  Even from this angle, you can tell my nails are quite a bit thicker, they're much less translucent than before.

Now for the tips:

Before

After
This is where there's even more of a difference.  My nails are thicker and more arched, which makes them much stronger. 

I'm really happy with how this treatment went (even after dealing with TWO nail rips!)

But what's more, I'm REALLY REALLY happy to start painting my nails again, and cover up my jankie thumbs until they grow out again lol.

Thanks for putting up with my absence over the last two weeks, and I'm back hopefully for a while without any major needs to disappear again.

Let me know what you think and what you look forward to me posting now that I'm back to regular polish again!

Hugs & Kisses & Great Polishes!

~ Cat

The Versatile Blogger Award

Hello everyone!

I'm honored and excited to write this post!  Why you ask?  Because this post is to acknowledge my nomination for The Versatile Blogger Award!

The lovely Shea, a good friend I've obtained in joining the polish community, was kind enough to nominate me for this award, humbling me beyond belief.  It's always such a pleasant surprise to be recognized for simply doing something you enjoy!

I enjoy sharing my love of nail polish with all of you, and never expect to receive praise, so it's always a humbling experience.

So, what does The Versatile Blogger Award entail?  I'm glad you asked!

Here are the rules to this award: 

1. Nominate 15 fellow bloggers who are relatively new to blogging
2. Let them know that you have nominated them.
3. Share 7 random facts about yourself.
4. Thank the bloggers who have nominated you.
5. Add the Versatile Blogger Award picture to your post


7 Random Facts About Me

1.                   I'm also obsessed with perfume, but polish is a slightly cheaper habit, so it's more in the forefront.
2.                   I love reading, particularly teen and young adult fiction (don't judge me haha).
3.                   I'm a huge 90s Nicktoons fan!
4.                   I have a slew of imaginary relationships with celebrities...and fictional characters (again, don't judge me haha)
5.                   I like to fall asleep with the TV on, as much as my parents wish I didn't.
6.                   I'm a Texas Aggie, which means a die hard football fan...Texas A&M and specific pro teams only.
7.                   I am a fount of useless trivia, and my friends laugh at the fact that I can connect any actor to a member of the cast of Twilight.
My Nominee's are 
 
  1. Swatch Out!
  2. Nail Polish In My Eyes!
  3. ehmkay nails 
  4. Just Talk Nails 
  5. Kinzie's Nail Hut 
  6. Nails 4 Dummies 
  7. Peer Pressure Polish 
  8. Plump and Polished 
  9. Polished 
  10. The Life, Times, and Lacquers of Lilmoon  
((Right now, I could only come up with 10 bloggers off the top of my head))

Now that I've compelted that, I want to thank Shea again, and thank all of you for reading my blog!!

Hugs & Kisses & Great Polishes!

~ Cat  

    Tuesday, January 29, 2013

    KBShimmer Spring 2013 Polish Press Release!!

    Hi all!

    My Nailtrition treatment is almost over, and I'm almost back from my blogging hiatus!

    But until then, I wanted to take a chance to post something really quickly that I hope will interest you all.

    I received notification via a press release from KB Shimmer of their new spring line of polishes and I wanted to share it with you!  (I had to slightly change the size of the images to fit the page, but you can click them to see them full size!)


    Contact: Christy Rose                                               FOR IMMEDIATE RELEASE

    Email: Sales@KBShimmer.com

    KBSHIMMER ANNOUNCES RELEASE OF NINE NEW POLISHES

    KBShimmer Spring Polish Line Set For Release February 15th, 2013
    KBShimmer is excited to announce the addition of 9 new colors to their 3-Free glitter polish line.  Owner Christy Rose says "With Easter, warmer weather, and Spring Break fast approaching February is the ideal time to introduce softer pastels to our lineup, but also to add a splash of bold color.
    The spring lineup includes three glitter top coats, two bold jellies, and four creamy pastels, one of which is scented.  "Our new line was created to play off the softer palette of spring, but also to accent unique glitters like small black dots and spring 2013 Pantone colors like the color of the year, Emerald Green.  We are also excited to debut this collection in our new printed bottles.  With the printed bottles, and our glitter grabbing flat brush, we feel our polish is a solid addition to any collection" says Rose. 
    KBSHimmer - spRING 2013 COLLECTION
    A Dot Mess - Fuchsia and black dots, hexes, and micro slices in a clear base - Top Coat
    Pastel Me More - Pastel colored glitters in a rainbow of colors and range of sizes - Top Coat
    Squared Away - Square glitters in a variety of sizes, colors and finishes including metallic and holographic in a clear base - Top Coat


    Spring Training - Soft green crelly full of pink, purple, blue and green floral toned glitters, scented with a floral freesia note - Full coverage in 2-3 coats
    Where My Peeps At - Soft yellow crelly with circle and tiny hex glitter in fun jelly bean like shades - Full coverage in 2-3 coats
    Lottie Dottie - Turquoise and fuchsia dots and coordinating glitters micro slices in a soft white base - Full coverage in 2-3 coats

    Iris My Case - Violet pastel crelly with glitters in purple, pink, silver and blue - Full coverage in 2-3 coats
    Get Clover It - Emerald green jelly with micro shimmer and circle glitter in shades of green, gold and turquoise- Best in 3 coats or layered over coordinating polish to cover nail line
    I Got A Crush On Blue - Royal blue jelly with holographic silver glitters ranging from micro to extra large- Best in 3 coats or layered over coordinating polish to cover nail line

    Shipping February 15, 2013
    KBShimmer products can be found at http://www.KBShimmer.com.  For sales outside of the US visit http://www.HarlowandCo.org.
    KBShimmer was founded in 2008 by the husband and wife team of Jason and Christy Rose.  KBShimmer offers unique and colorful nail glitter nail polishes that are Big 3 Free, with all glitter formulas being completely free of chemicals such as toluene, formaldehyde, formaldehyde resin, and dibutyl phthalate (DBP).  KBShimmer glitter polishes feature a flat glitter grabbing brush for easy application.  KBShimmer also offers a 2-free quick dry polish top coat, olive oil lotion, sugar scrubs, lip balms, cold process soaps and other skin care products.
    ###
    If you would like more information about KBShimmer, contact Christy Rose by emailing sales@kbshimmer.com or visiting http://www.KBShimmer.com.
    - 2013 KBShimmer. All rights reserved

    Wednesday, January 23, 2013

    Orly Nailtrition Week 1

    Hi all!

    Sorry it's been so long, but there's not a lot going on with my nails while I'm doing this treatment (other than the fact that I tore my other thumb nail and had to patch it, and I'm sure you didn't need to see that again haha).

    So I've had to be reluctantly absent, but I'm back to make a post about the progress of my first week of Nailtrition (which means I still have one more week :/ but it's something!)

    So I wanted to give a before and after for this first week out of two.

    Here is what my nails looked like before I did the week of treatment:


    As you can see they were pretty thin, and though not exactly short, very slow growing and brittle.

    I put on two coats of Nailtrition the first day and one coat every day after that and here we are one week later.


    It may not look like a huge difference, but already my nails are longer and quite a bit thicker than before even after just one week.

    Before this pic, I removed the first week of Nailtrition (don't worry that's what you're supposed to do).  And I'm now going to repeat the process (two coats today and one coat every day after) for another week.

    I'll be back to show you the final result next week and then back to real polish!!

    So what do you guys think?  What do you use to make or keep your nails healthy?

    Hugs & Kisses & Great Polishes!

    ~ Cat
    Sunday, January 20, 2013

    BLOG SALE/SWAP!

    Hey all!

    Wanted to let you know that I've posted a Blog Sale/Swap!

    You can find it on the tabs at the top of the page!

    Enjoy!

    Thursday, January 17, 2013

    Nail patching... (pic spam)

    Ok, so apparently my worry about not having things to post while I'm using Nailtrition was all in vain.  I'm getting all kinds of things to post about...and not anything I'm particularly fond of, though it is nice to share some tips.

    What do I mean?

    Well last night I got to experience the epitome of nail blogger nightmares...a tear in my nail!

    I was opening a box, and my hand slipped and I felt a pull and I looked down and it was all I could do not to cry.

    This is what I found:

    You can see the torn corner on the upper right of my thumb nail, a perfect little square rip and it hurt like no one's business.

    Now, it's taken we quite some time to get my nails where they'll grow nicely and I knew I wasn't going to be able to bring myself to cutting this nail and starting over.

    So instead, I remembered an awesome tutorial I watched on Collette's (SimpleLittlePleasure's) YouTube channel for silk wraps for rips and breaks.  Seen here:


    So I carefully wrapped my thumb in a bandaid to sleep so I wouldn't snag the nail, and first thing this morning I ran to Sally to pick up some supplies.  Now, I know you can use a teabag, but I didn't have any, or nail glue or any of the other things I'd need so this was just as easy of an option, and its nice to have a lot of extra silk wraps for the future.

    Here's what I used (pretty much exactly what Colette used):

    All except for the manicure scissors (I already had those) I bought at Sally's.  In the silk wraps, you get 40 nail shaped wraps, but for small tears you can cut smaller pieces and get much more use out of them.  I also got a bottle of gel resin and a four-sided buffer.

    So following the steps in the video I proceeded to repair my nail.

    Here is the application of the piece of silk patch.

    After trimming the excess, applying the 1st layer of resin, and filing off the excess patch.


    After second layer of resin and buffing the seams to make the nail more even.

    After applying two coats of Nailtrition.
    As you can see, you can barely see the patch on the nail at all.  In person there's a little bit of a visible seam, but you can't feel it when you touch it.

    Hopefully the patch will stay on long enough for my nail to grow out, allowing me to file off the break over time without having the chop off the length of my nail.

    Have you ever had to repair a break?  How'd it go, and what did you use?

    Hugs & Kisses & Great Polishes!

    ~ Cat