Thursday, March 7, 2013

OPI Wooden Shoe Like to Know

Hi all!

I'm bringing you another manicure, following the philosophy of simple being great.

I wanted to show a gorgeous polish on it's own today, and I hope you all like it!

OPI Wooden Shoe Like to Know
This is OPI's Wooden Shoe Like to Know, a gorgeous milk chocolate color with the slightest hint of reddish purple in it.  What's more, this polish has a great subtle gold-bronze shimmer to it (only slightly visible in this picture, sorry, but it's much more obvious in person).

I really like this polish, I tend to like browns in the bottle but not as much on the nail, but this one has such a nice warmth to it that it looks really great!

What do you guys think?  How do you feel about brown nail polish?

Leave me your comments and Like and Follow me on Facebook, Instagram, Twitter, Tumblr, and Pinterest!

Hugs & Kisses & Great Polishes!

~ Cat

Wednesday, March 6, 2013

Pink Wednesday: Milani Digital and Maybelline Rose Bling

It's another Pink Wednesday!

I'm really starting to love these days, which should be no surprise with my love of pink.

But what's more I like experimenting in ways to do pink nails that don't get boring.

I hope I succeeded today, but even if I didn't, I really liked the outcome for myself, so I'm excited to share it with you all.

Milani Digital and Maybelline Rose Bling
For the main color in this manicure I used Milani Digital from their 3D Holographic collection.  This polish a beautiful combination of a scattered and linear holo in a great blue-toned rosie pink.

For the accent, I used Maybelline Rose Bling from the Color Show Sequins collection.  This is a pale pink, almost rose gold glitter with pink holo hexes and hot pink hexes.

I was afraid these two together would be a bit busy, what with the amount of sparkle, but I was wrong!  The different tones of pink look nice together and the holo glitter next to a holo polish is surprisingly fun.

How do you guys feel about this one?  Have you tried any combinations that you weren't sure about and they ended up working out?

Leave your comments and Like and Follow me in the links in the About Me section.

Hugs & Kisses & Great Polishes!

~ Cat

Tuesday, March 5, 2013

Dollar Nail Art Foil mini review

Hi all!

For Tuesday I wanted to share a new product (well new to me) that technically falls into the two-toned Tuesday category, so yay!

I'm not sure how many of you have heard of nail foils, but they're a really fun nail art product to add a hint of metal, or shine, or unique pattern or finish to your manicures.

I recently was able to purchase my first nail foils from Dollar Nail Art and decided I'd give them a try and share my experience with all of you.

Dollar Nail Art Ocean Mist nail foil
The first color I decided to try was Ocean Mist, a fun metallic foil with a blend of silver, green, blue, and purple to make a pattern similar to what you see when your see oil on top of water in a parking lot.

Before beginning, cut pieces of nail foil from the roll (each roll is about 5 ft.) to fit each nail.

Application took a little practice.  When you order from Dollar Nail Art (just fyi for online orders they require a minimum purchase of $25, less than that you can mail order) and get four foils, they send you a free bottle of their foil adhesive.  To apply, to brush on a thin layer of this adhesive, which goes on milky and dries clear.  When the adhesive is dry it's still tacky, but DON'T TOUCH IT or else it can affect the hold on the foil.

Once dry, take your first piece of nail foil and place it on the nail dull or non patterned side down.  Now, depending on the foil (which is where the practice comes in) it may be better to use either a Q-tip or your fingernail, for this pattern, my finger nail worked best.  Using either one, gently rub the top of the foil over your nail making sure to cover the whole area desired. 

Then, remove the clear backing, which should be basically popping off anyway.  If you've missed any spots, place the foil piece over the bald spot and rub gently to fill empty space.

Now for this pattern, for me, Any use of top coat complete RUINED the pattern, the whole foil would turn silver and never turn back.  I've heard the use of UV gel top coat might work, but sadly I have none to try.  So for me, I had to go without top coat at all. 

That being said, if you know none of your top coats will protect rather than ruin the foils, then I suggest applying them the day you plan to wear them rather than the night before, simply because the foil rubs off very easily without that protection of top coat.  I learned the hard way :(

Nevertheless, despite the issues I had with the foils, I chalk it all up to learning curve.  In general these are gorgeous and a lot of fun as long as you learn the dos and don'ts.  Plus, you can't really beat a dollar a piece!!

Have you tried these nail foils?  Do you have any tips?

Leave your comments below and Like and Follow me on all your social media!

Hugs & Kisses & Great Polishes!

~ Cat

Color Club Sparkle and Soar

Okay, okay...so I know Monday is supposed to be nail art monday, but I completely forgot and by the time I remembered I was in bed going to sleep (as is always the way lol).

But, I hope the beauty of the color makes up for the lack of nail art.

I wanted to break out some of my oranges, a color I love (except burnt orange....) but often forget about sadly.

But I managed to find something gorgeous to show you all!

Color Club Sparkle and Soar w/ Julep Stella
This is Color Club's Sparkle and Soar, a great orange mutlichrom jelly foil...at least that's the best description I can give haha.  It's a really unique polish that's a bright orange with gold and bright green flashes in certain light, which are basically impossible for me to capture on film.  The polish can be a bit sheer, so I put on some Julep Stella undies but even with two coats of that I have some VNL in the right light, so if you're not a fan, make sure you have a really opaque polish for your undies.

As usually this polish is one that reminds me how much I love oranges but makes me sad to know I often neglect them. 

What do you guys think?  What's a polish color you love on but sometimes pass over?

Leave me comments and Like and Follow all over the place!

Hugs & Kisses & Great Polishes!

~ Cat

Sunday, March 3, 2013

My Birthday Manicure! China Glaze Bling It On and OPI You're Such a Budapest

Today's my birthday!  Yup, I'm 24 today!

Not an entirely exciting birthday by any means, but a birthday nonetheless.

I wanted to share the manicure I wore for the day with you all!

I wanted to have something fun on my nails and managed to come up with a great combo from recent polish purchases/swaps.

Here's what I have on.

China Glaze Bling It On and OPI You're Such a Budapest
For the under color I used OPI You're Such a Budapest from the new Euro Centrale collection.  This polish is a beautiful pastel, blue-tinted lavender with a very subtle shimmer to it (difficult to see with the glitter over it obviously).  The formula for this one can be a little thin or streaky for the first two coats, but coat three makes it even and smooth, and it dries with a gorgeous shine even without top coat!

Over You're Such a Budapest I used China Glaze Bling It On from the new Glimmers collection.  This polish a glitter in a clear base, consisting of black and indigo/violet glitters in large, medium, and small hexes and bars.  It's a lot of fun on the nails!  It can lay a little rough, but it isn't too bad and it spreads fairly evenly without needing a lot of dabbing or getting blobby. 

I love these two together, bringing out a bit more of the blue-tinted purples and just looking like a party, very fitting I'd say!

What do you guys think?  Are you a fan of the new collections for Spring?

Leave me comments and Follow and Like me (check the About Me section).

Hugs & Kisses & Great Polishes!

~ Cat

Saturday, March 2, 2013

OPI Man of La Mancha

I'm bringing you another one of the HTF lemmings I've fulfilled!

I actually manged to find this one on Amazon for an amazing deal and just had to snap it up.

It's a polish from OPI's older black labels, from back when they used to do a lot more experimenting with color and finish it seems like.

This one is a breathtaking multi-chrome that I'm just in love with and am so glad to say it's part of my collection.

Here's what it looks like.


OPI Man of La Mancha

OPI Man of La Mancha

The polish I'm talking about is OPI Man of La Mancha from their 2003 Holiday on Broadway Collection.  This polish a a gorgeous multi-chrome that shifts from a brick red to a bright copper orange to a gold to a bright flash of green.  It's just fascinating to watch the shifts in light.

To make sure the color was at it's most brilliant I used OPI Manicurist of Seville for undies which just makes the red angle of this polish pop that much more.

I'm in love with this one, I'm really sad to take it off!  But alas, it must happen because I must move on to something just as lovely...

What do you guys think of this one?  Do you have a favorite HTF nail polish?

Leave me comments and Like and Follow me on Twitter, Instagram, Pinterest, Tumblr, and Facebook!

Hugs & Kisses & Great Polishes!

~ Cat

Friday, March 1, 2013

My first Kracie Happy Kitchen kit!! (Major Pic Spam)

Ok, I may be the only person who is as obsessed with these things as I am, but you're here and I'm going to make you see it anyway...MWAHAHAHAHA!!

Alright, I'm back.

I got some of my first Kracie Happy Kitchen candy making kits today from my friend Kim and I was so excited to try them that I decided to make one!!

I started with the cake kit and decided I'd take step by step pictures so you guys can see just what these kits are.

So be prepared for picture spam!

What you'll need:  Kit, Scissors, Water, Microwave

Unboxed kit

Ingredient packets
Step 1:  Cut water scoop and strawberry mold
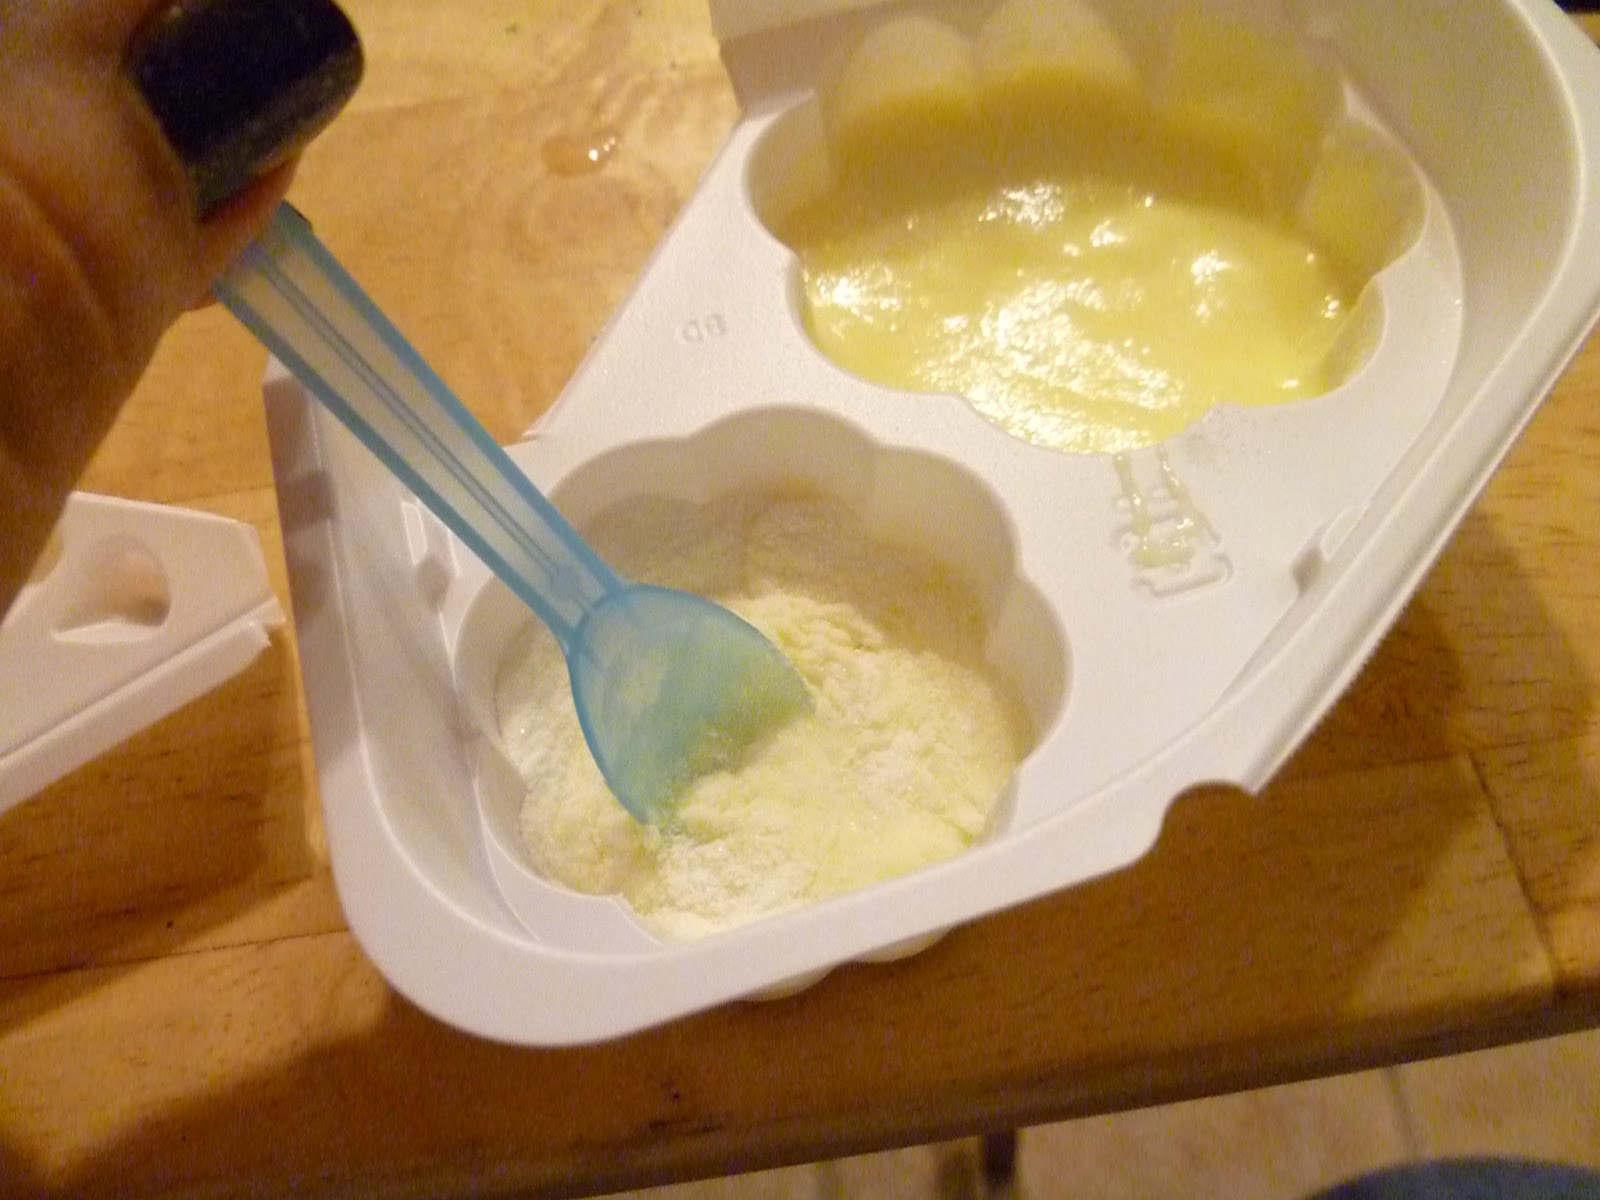
Step 2: Pour yellow packet into larger cake mold.
Step 3: Pour 2 scoops of water into larger cake mold.
Step 4: Mix well.
Step 5: Pour orange packet into smaller cake mold.
Step 6: Pour 1 scoop of water into smaller cake mold.
Step 7: Mix well.
Step 8: Microwave.  This varies per microwave, mine took 30 seconds, but I suggest doing 15 seconds at a time until done.
Step 9: Let cool slightly and remove from tray. Wash plastic tray.
Step 10: Pour red packet into smaller cake mold.
Step 11: Pour 1 scoop of water into smaller cake mold. Mix well
Step 12: Using spoon, pour red gel mixture into strawberry molds and set aside.
Step 13: Pour blue packet into larger cake mold.
Step 14: Pour 2 scoops of water into the larger cake mold.
Step 15: Mix well.
Step 16: Frost cakes starting with larger layer.
Optional step: Use remaining strawberry gel for cake filling, spread on bottom of smaller cake layer.
Step 17: Frost top and sides of cake.  Rinse out tray.
Step 18: Pour pink packet into smaller cake mold.
Step 19: Pour 1 scoop of water into smaller cake mold.
Step 20: Mix well.
Step 21: Scoop pink frosting into pastry bag.  Squeeze frosting to the corner and snip the corner with scissors.
Step 22: Add sprinkles as desired for decoration.
Step 23: Add gel strawberries to the cake as desired.
And here's my finished product!


What do you guys think?!  It was so much fun!  I can't wait to try the other kits! 

Have you ever tried the Kracie candy making kits?  What's your favorite?

Hugs & Kisses & Great Polishes!

~ Cat